Archive for the ‘Linux’ Category

Enter into rescue mode.
mkdir /mnt/disk
mount /dev/vda1 /mnt/disk
chroot /mnt/disk –> this is to change the root.
Now vi /etc/grub.conf (if not chrooted, the file should be /mnt/disk/etc/grub.conf) and change the default value to any otehr kernel number (current kernel is 0. we have to change it to 1 or 2 or 3 like that)
# cat /etc/grub.conf
# grub.conf generated by anaconda
#
# Note that you do not have to rerun grub after making changes to this file
# NOTICE: You do not have a /boot partition. This means that
# all kernel and initrd paths are relative to /, eg.
# root (hd0,0)
# kernel /boot/vmlinuz-version ro root=/dev/vda1
# initrd /boot/initrd-[generic-]version.img
#boot=/dev/vda
default=3
timeout=5
serial –unit=0 –speed=115200
terminal –timeout=5 serial console
title CentOS (2.6.32-696.20.1.el6.x86_64)
  root (hd0,0)
  kernel /boot/vmlinuz-2.6.32-696.20.1.el6.x86_64 ro root=UUID=6446959f-deb2-491f-93a7-bdbbf5ebf31e consoleblank=0 crashkernel=auto SYSFONT=latarcyrheb-sun16 LANG=en_US.UTF-8 KEYTABLE=us nox2apic
title CentOS (2.6.32-696.18.7.el6.x86_64)
  root (hd0,0)
  kernel /boot/vmlinuz-2.6.32-696.18.7.el6.x86_64 ro root=UUID=6446959f-deb2-491f-93a7-bdbbf5ebf31e consoleblank=0 crashkernel=auto SYSFONT=latarcyrheb-sun16 LANG=en_US.UTF-8 KEYTABLE=us nox2apic
  initrd /boot/initramfs-2.6.32-696.18.7.el6.x86_64.img
title CentOS (2.6.32-696.16.1.el6.x86_64)
  root (hd0,0)
  kernel /boot/vmlinuz-2.6.32-696.16.1.el6.x86_64 ro root=UUID=6446959f-deb2-491f-93a7-bdbbf5ebf31e consoleblank=0 crashkernel=auto SYSFONT=latarcyrheb-sun16 LANG=en_US.UTF-8 KEYTABLE=us nox2apic
  initrd /boot/initramfs-2.6.32-696.16.1.el6.x86_64.img
title CentOS (2.6.32-696.10.3.el6.x86_64)
  root (hd0,0)
  kernel /boot/vmlinuz-2.6.32-696.10.3.el6.x86_64 ro root=UUID=6446959f-deb2-491f-93a7-bdbbf5ebf31e consoleblank=0 crashkernel=auto SYSFONT=latarcyrheb-sun16 LANG=en_US.UTF-8 KEYTABLE=us nox2apic
  initrd /boot/initramfs-2.6.32-696.10.3.el6.x86_64.img
title CentOS (2.6.32-696.:wq10.1.el6.x86_64)
  root (hd0,0)
  kernel /boot/vmlinuz-2.6.32-696.10.1.el6.x86_64 ro root=UUID=6446959f-deb2-491f-93a7-bdbbf5ebf31e consoleblank=0 crashkernel=auto SYSFONT=latarcyrheb-sun16 LANG=en_US.UTF-8 KEYTABLE=us nox2apic
  initrd /boot/initramfs-2.6.32-696.10.1.el6.x86_64.img
:wq!
Now unrescue and enter into vnc or server.
If one kernel is failed to boot, then change the kernel number until the server get booted.
Now check the old (now we have changed to current kernel) kernel
===
# uname -r
2.6.32-696.18.7.el6.x86_64
===
The kernel with issue was 20.1. The error was due to some missing modules in that kernel, due to that we got kernel panic error. So, now we have to remove that kernel without dependencies (20.1)
=====
root@162-144-43-30.webhostbox.net [~]# rpm -qa | grep 2.6.32-696.20
kernel-2.6.32-696.20.1.el6.x86_64
kernel-headers-2.6.32-696.20.1.el6.x86_64
kernel-devel-2.6.32-696.20.1.el6.x86_64
kernel-firmware-2.6.32-696.20.1.el6.noarch
root@162-144-43-30.webhostbox.net [~]# rpm -e –nodeps kernel-2.6.32-696.20.1*
warning: erase unlink of /lib/modules/2.6.32-696.20.1.el6.x86_64/modules.order failed: No such file or directory
warning: erase unlink of /lib/modules/2.6.32-696.20.1.el6.x86_64/modules.networking failed: No such file or directory
warning: erase unlink of /lib/modules/2.6.32-696.20.1.el6.x86_64/modules.modesetting failed: No such file or directory
warning: erase unlink of /lib/modules/2.6.32-696.20.1.el6.x86_64/modules.drm failed: No such file or directory
warning: erase unlink of /lib/modules/2.6.32-696.20.1.el6.x86_64/modules.block failed: No such file or directory
====
Now update the kernel.Our current kernel is 18.7 and it will update to 20.1
===
root@162-144-43-30.webhostbox.net [~]# uname -r
2.6.32-696.18.7.el6.x86_64
===
Now shut down
===
[~]# shutdown -r now
Broadcast message from root@162-144-43-30.webhostbox.net
  (/dev/pts/0) at 8:26 …
The system is going down for reboot NOW!
===
Now check and the kernel should be 20.1
===
# uname -r
2.6.32-696.20.1.el6.x86_64
===
Now check grub.conf
======
default=0
timeout=5
serial –unit=0 –speed=115200
terminal –timeout=5 serial console
title CentOS (2.6.32-696.20.1.el6.x86_64)
  root (hd0,0)
  kernel /boot/vmlinuz-2.6.32-696.20.1.el6.x86_64 ro root=UUID=6446959f-deb2-491f-93a7-bdbbf5ebf31e consoleblank=0 crashkernel=auto SYSFONT=latarcyrheb-sun16 LANG=en_US.UTF-8 KEYTABLE=us nox2apic
  initrd /boot/initramfs-2.6.32-696.20.1.el6.x86_64.img
title CentOS (2.6.32-696.18.7.el6.x86_64)
  root (hd0,0)
  kernel /boot/vmlinuz-2.6.32-696.18.7.el6.x86_64 ro root=UUID=6446959f-deb2-491f-93a7-bdbbf5ebf31e consoleblank=0 crashkernel=auto SYSFONT=latarcyrheb-sun16 LANG=en_US.UTF-8 KEYTABLE=us nox2apic
  initrd /boot/initramfs-2.6.32-696.18.7.el6.x86_64.img
title CentOS (2.6.32-696.16.1.el6.x86_64)
  root (hd0,0)
  kernel /boot/vmlinuz-2.6.32-696.16.1.el6.x86_64 ro root=UUID=6446959f-deb2-491f-93a7-bdbbf5ebf31e consoleblank=0 crashkernel=auto SYSFONT=latarcyrheb-sun16 LANG=en_US.UTF-8 KEYTABLE=us nox2apic
  initrd /boot/initramfs-2.6.32-696.16.1.el6.x86_64.img
title CentOS (2.6.32-696.10.3.el6.x86_64)
  root (hd0,0)
  kernel /boot/vmlinuz-2.6.32-696.10.3.el6.x86_64 ro root=UUID=6446959f-deb2-491f-93a7-bdbbf5ebf31e consoleblank=0 crashkernel=auto SYSFONT=latarcyrheb-sun16 LANG=en_US.UTF-8 KEYTABLE=us nox2apic
  initrd /boot/initramfs-2.6.32-696.10.3.el6.x86_64.img
title CentOS (2.6.32-696.10.1.el6.x86_64)
  root (hd0,0)
  kernel /boot/vmlinuz-2.6.32-696.10.1.el6.x86_64 ro root=UUID=6446959f-deb2-491f-93a7-bdbbf5ebf31e consoleblank=0 crashkernel=auto SYSFONT=latarcyrheb-sun16 LANG=en_US.UTF-8 KEYTABLE=us nox2apic
  initrd /boot/initramfs-2.6.32-696.10.1.el6.x86_64.img
~
====
That’s it.
 ClamAV and Maldet scanner (aka Linux Malware Detect) are widely known as two excellent choices for identifying malware on Linux environment. What you may not realize, is that they can be team up together. The benefit of doing this is a faster, more effective malware scan. This tutorial is based on cPanel/WHM system. We will install and configure both ClamAV and Maldet (LMD).

Installing ClamAV

ClamAV is a one of the most popular open source antivirus plugin available for cPanel servers. ClamAV allows individual cPanel users to scan their home directory and emails against malicious files. This article will explain you the steps to install ClamAV plugin from WHM.
  1. Log into WHM with root user.
  2. Under cPanel section, select the Manage Plugins option.
  3. Check the checkbox Install and keep updated beside ClamAV and then click Save at the bottom. This will start the install process and it may take a few minutes. Don’t close the web browser until installation process completes. Once installation is finished, you’ll receive a Process Complete message.
  4. Log out and login again to WHM.
  5. Under Plugins section, select Configure ClamAV Scanner option.
  6. At this stage, you can set the global scan permissions. If you wish to allow all cPanel users to scan their files, then check the checkboxes Scan Entire Home DirectoryScan MailScan Public FTP Space, and Scan Public Web SpaceSave the changes.
That’s it!!!

Installing Maldet

  1. Login into your VPS via SSH as the root user.
  2. Run below commands to install LMD (Linux Malware Detect).
    cd /usr/local/src/ 
    wget http://www.rfxn.com/downloads/maldetect-current.tar.gz
    tar -xzf maldetect-current.tar.gz
    cd maldetect-*
    sh ./install.sh
    

Linking both ClamAV and Maldet together for the best performance

If you were to run a Linux Malware Detect scan now, it would run with no problem, however, it would not include ClamAV’s definitions, therefore slowing down the scan completion time and threat detection ratio. To solve this, we must create two symbolic links, as follows:
 
ln -s /usr/local/cpanel/3rdparty/bin/clamscan /usr/local/bin/clamscan
ln -s /usr/local/cpanel/3rdparty/bin/freshclam /usr/local/bin/freshclam

Running a malware scan

Now when you run Maldet scan, it will also include the definition of ClamAV. If you wanted to run a malware scan of /home, you just need to run below command.
maldet -a /home/?
The above command will scan all files and directories within the /home directory, which is where the content for cPanel accounts is stored.

Install Maldet in cPanel Server

Posted: March 21, 2018 in Linux

Login to cPanel server via SSH as the root user.

Execute the below commands:

# cd /usr/local/src/
# tar -xzf maldetect-current.tar.gz
# cd maldetect-*
# sh ./install.sh

Remove unused gzipped tar file

# rm /usr/local/src/maldetect-current.tar.gz

You can run a Linux Malware Detect scan now, it would run with no problem. However, it would not include ClamAV’s definitions, if you not before installed ClamAV scanner. Maldet without installed ClamAV slowing down the scan completion time. Also threat detection ratio is low without malware expert signatures.

Updating the application

Manually update maldet

# maldet -d
# maldet -u

Configuring Linux Malware Detect (Maldet)

By default all options are fully commented in the configuration file, so configure it according to your needs. But before making any changes let’s have a detailed review of each option below.

Open file /usr/local/maldetect/conf.maldet and make changes according to your needs

# nano /usr/local/maldetect/conf.maldet
  1. email_alert : If you would like to receive email alerts, then it should be set to 1.
  2. email_addr : Add your email address to receive malware alerts.
  3. quarantine_hits : The default quarantine action for malware hits, it should be set 0.
  4. quarantine_clean : Cleaning detected malware injections, it should be set 0.
  5. quarantine_suspend_user : The default suspend action for users wih hits, set it as per your requirements.
  6. quarantine_suspend_user_minuid : Minimum userid that can be suspended.

Running full malware scan user home directories

First i suggest full scan user home directories to detect and clean malware:

The Bellow command will scan all files and directories within the /home directory, which is where the content for cPanel accounts is stored.

# maldet -a /home/?

Later you can only scan example all .php files. Command Below:

#maldet --include-regex ".*.php$" -a /home/?/public_html

Below is a sample output of what you should see:

root@server [~]# maldet -a /home/?
Linux Malware Detect v1.5.0
            (C) 2002-2013, R-fx Networks <proj@r-fx.org>
            (C) 2013, Ryan MacDonald <ryan@r-fx.org>
inotifywait (C) 2007, Rohan McGovern <rohan@mcgovern.id.au>
This program may be freely redistributed under the terms of the GNU GPL v2
maldet(15196): {scan} signatures loaded: 10727 (8823 MD5 / 1904 HEX)
maldet(15196): {scan} building file list for /home/*, this might take awhile...
maldet(15196): {scan} file list completed, found 1124974 files...
maldet(15196): {scan} found ClamAV clamscan binary, using as scanner engine...
maldet(15196): {scan} scan of /home/* (1124974 files) in progress...
maldet(15196): {scan} scan completed on /home/*: files 1124974, malware hits 0, cleaned hits 0
maldet(15196): {scan} scan report saved, to view run: maldet --report 013344-1347.5196
root@server [~]#

This post shows you how to reset the root password of RHEL7/CentOS7 systems with screenshots. As a Linux admin, we may come in a situation to reset the forgetten root password on RHEL7/CentOS7 systems.

Steps involved to recover/reset the root password:
1. Boot the Server to reset the root password.
2. Edit the Grub2 boot menu.
3. Remount the / partition to read/write mode.
4. Reset the root password.
5. Relabel the SELinux
6. Reboot the server and login with the new root password.

1. Boot the Server to reset the root password.
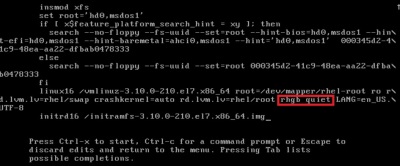
Boot the Server and interrupt the grub2 boot menu. Once you interrupted, your screen will be similar to the image below.

reset root password rhel7

2. Edit the Grub2 boot menu.
Press “e” to edit the default boot OS, normally it would be the first line. Once you pressed “e”, find the words “rhgb quiet” in the vmlinuz kernel line as shown in the below image.

Resetting the Root Password of RHEL7

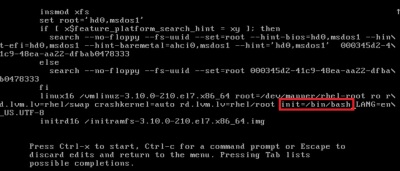
Replace the words “rhgb quiet” with “init=/bin/bash” and press “Ctrl + x” as shown in the below image. This will take us to the single user mode which allow us to perform the maintenance activity.

How to reset the root password on RHEL 7

3. Remount the / partition to read/write mode.
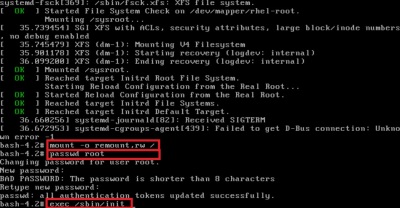
By default root partition will be mounted as read-only in single user mode. If we want to reset the password, the passwd changes should be affected in /etc/passwd file. So it should be writable to do the passwd changes. So we make the / partition to read/write mode.

bash-4.2# mount -o remount,rw /

Reset Forgotten Root Password

4. Reset the root password.
Lets reset the password of root with your new password using the below command, which will prompt to enter the new password for two times as shown in the above image.

bash-4.2# passwd root

5. Relabel the SELinux
This is a  steps mandatory to ensure that the SELinux context for entire system is relabeled after reboot, If you ignore this step, you will not be able to login with your new root password.

bash-4.2# touch /.autorelabel

6. Reboot the server and login with the new root password.
Once you reset the root password, reboot the server using the below and login with your new password.

bash-4.2# exec /sbin/init

Once the server is rebooted, you can login with your new root password successfully.

Thanks for reading our post. share with your friends. We appreciate your feedback, Leave your comments if any.
We have more articles to be updated soon.

RAID error

Posted: September 5, 2016 in Linux

mdadm –manage /dev/md0 –add /dev/sdd1
mdadm: Cannot open /dev/sdd1: Device or resource busy


It means the disk is not new, it has data , it has some raid signature (raid metadata). reboot and try to insert in single user  mode by using the below commands.

=========

mdadm –fail /dev/md0 /dev/sdd1

Even if the first command failed, run the below command.

mdadm –manage /dev/md0 –add /dev/sdd1

/dev/sdd1 added  ==> the result should like this.

Now the result should be

================

# cat /proc/mdstat
Personalities : [raid10] [raid1]
md0 : active raid1 sdd1[4] sdc1[1] sdb1[2] sda1[0]
200704 blocks [4/3] [UUU_]
resync=DELAYED

md3 : active raid10 sdd2[4] sdc2[1] sdb2[2] sda2[0]
1841964544 blocks 256K chunks 2 near-copies [4/3] [UUU_]
[========>…………] recovery = 41.5% (382455104/920982272) finish=148.3min speed=60480K/sec

md2 : active raid10 sdd5[3] sdc5[1] sdb5[2] sda5[0]
2104320 blocks 256K chunks 2 near-copies [4/4] [UUUU]

md1 : active raid10 sdd3[4] sdc3[1] sdb3[2] sda3[0]
109048832 blocks 256K chunks 2 near-copies [4/3] [UUU_]
resync=DELAYED

unused devices: <none>

===============

After resyncing the final result should be

md3 : active raid10 sdd2[4] sdc2[1] sdb2[2] sda2[0]
1841964544 blocks 256K chunks 2 near-copies [4/3] [UUUU]


We have 2 main cPanel accounts. These 2 accounts should be migrated from one server to another.One account as main account and another main account as addon account.

For main domain.
===============
Take backup in old server or via FTP to new server
Rsync the backup to new server
Restore the backup in new server.
Rsync mails from new server.

For addon domain.
================
When we migrate a main domain as an addon domain to a new server, follow the below steps and note the things below.
Addon account’s document root under main account should be /home/username/public_html/addondomain.com.
* Rsync the addon account’s public_html contents from old server to new server.
* Create database of addon domain in cPanel.
* Create databse users.
* Take mysql database backup in old server and rsync it to new server.
* Restore the database.
* Give privileges to the database user from cPanel
* Create email accounts.
* from backend, rsync the mail contents from old server to new server.

Error : 503 Valid RCPT command must precede DATA


Make sure that “My Outgoing Server Requires Authentication” is enabled in outlook or any email client that you are using. Adding detailed steps again on how to enable “My Outgoing Server Requires Authentication” .

From the Tools menu, select “Account Settings”
Select your Email account and click the “Change” button above..
Click the “More Settings” button in the bottom-right corner of the E-Mail Accounts window.
In the Internet Email Settings window, click the “Outgoing Server” tab. Ensure that the box next to “My outgoing server (SMTP) requires authentication” is checked
Click the “Advanced” tab and make sure that “Use the following type of encrypted connection” is set to “None” for the incoming (POP3) and the outgoing (SMTP) port settings.

If you face an issue in sending mail to the email addresses under a particular domain with the following SPF error,

===============

2016-06-10 12:37:17 1bBKkV-0001P9-Hr SMTP connection outbound 1465558637 1bBKkV-0001P9-Hr username@domain.com
2016-06-10 12:37:20 1bBKkV-0001P9-Hr ** username2@domain2.com R=dkim_lookuphost T=dkim_remote_smtp H=cheviot2domain.com [XX.XX.XX.XX] X=TLSv1:AES256-SHA:256 CV=yes: SMTP error from remote mail server after RCPT TO:<username2@domain2.com>: 550-5.7.1 sender <enquiries@domain.com> via hostname (hostname [XX.XX.XX.XX]) SPF result Fail; #702 (s59CbH067804399200)\n550-5.7.1 The line above says why Newcastle University rejected mail.\n550-5.7.1 Please see <http://www.ncl.ac.uk/itservice/security/emailreject/&gt;\n550 5.7.1 for a more detailed explanation.

===============

Fix

===
change spf to “v=spf1 mx a” and save it in domain’s dns zone file. (You can create SPF record for the sender domain in http://www.spfwizard.net/ – First 2 options should be “yes”)

Now test by sending a mail from your domain’s test account.The result should be

=======

]# grep 1bBNRy-0002Sj-6P /var/log/exim_mainlog
2016-06-10 15:30:18 1bBNRy-0002Sj-6P H=(hostname) [::1]:37898 Warning: Message has been scanned: no virus or other harmful content was found
2016-06-10 15:30:18 1bBNRy-0002Sj-6P H=(hostname) [::1]:37898 Warning: “SpamAssassin as cpaneleximscanner detected OUTGOING smtp message as NOT spam (-1.0/99)”
2016-06-10 15:30:18 1bBNRy-0002Sj-6P <= test123@domain.com H=(hostname) [::1]:37898 P=esmtpa A=dovecot_login:test123@domain.com S=825 id=1ed445e8e7cff46243c403cbb58d0bb3.squirrel@hostname T=”Test mail” for username2@domain2.com
2016-06-10 15:30:18 cwd=/var/spool/exim 3 args: /usr/sbin/exim -Mc 1bBNRy-0002Sj-6P
2016-06-10 15:30:18 1bBNRy-0002Sj-6P SMTP connection outbound 1465569018 1bBNRy-0002Sj-6P username@domain.com
2016-06-10 15:30:23 1bBNRy-0002Sj-6P => username2@domain2.com R=dkim_lookuphost T=dkim_remote_smtp H=cheviot2domain.com [XX.XX.XX.XX] X=TLSv1:AES256-SHA:256 CV=yes C=”250 2.0.0 message s59FUK0435215064B9 accepted #554 (s59FUI043521506400)”
2016-06-10 15:30:23 1bBNRy-0002Sj-6P Completed

========

Plesk – Essentials

Posted: May 13, 2016 in Linux

Plesk
=========================

1. To see Plesk admin password:
cat /etc/psa/.psa.shadow

/usr/local/psa/bin/admin –show-password
2. Mysql access : mysql -uadmin -p`cat /etc/psa/.psa.shadow`
Service :/etc/init.d/mysqld

Note: Service name differs on different Linux distributives:

mysqld on CentOS/RHEL 5 and 6
mariadb on CentOS/RHEL 7
mysql on Debian/Ubuntu

3.Rebuilding apache configuration file: /usr/local/psa/admin/bin/httpdmng –reconfigure-domain <domain name>

/usr/local/psa/admin/bin/httpdmng –recofigure-all

4. Document root: /var/www/vhosts/domain.com/httpdocs

5. Apache

Logs
Global Access and Error logs: /var/log/httpd/
Domain logs: /var/www/vhosts/<domain>/logs
Services
Stop: /etc/init.d/httpd stop
Start: /etc/init.d/httpd start
Restart: /etc/init.d/httpd restart
Configuration
/etc/httpd/conf/httpd.conf
/etc/httpd/conf.d/zz010_psa_httpd.conf (includes generated configuration files with the rest of the vhosts and the server configuration)
NOTE: The service is called apache2 on SuSE, Debian, and Ubuntu. The path to its logs is /var/log/apache2 and the path to the configs is /etc/apache2.

6. Logs :
Error log: /var/log/sw-cp-server/error_log and /var/log/sw-cp-server/sw-engine.log
Access log: /usr/local/psa/admin/logs/httpsd_access_log

7. Plesk service : /etc/init.d/psa
8. Configuration

PHP config: /usr/local/psa/admin/conf/php.ini
Panel config: /usr/local/psa/admin/conf/panel.ini
Web server config: /etc/sw-cp-server/conf.d/plesk.conf

9. path for qmail: /var/qmail/mailnames

10. NGINX

Logs
Error log: /var/log/nginx/error.log
Access log: /var/log/nginx/access.log
Domain logs: /var/www/vhosts/<domain>/logs/proxy_access*_log
Services
Stop: /etc/init.d/nginx stop
Start: /etc/init.d/nginx start
Restart: /etc/init.d/nginx restart
NOTE: To disable nginx, go to “Tools & Settings > Services Management” and stop nginx from there.
Configuration
/etc/nginx/nginx.conf
/etc/nginx/conf.d/zz010_psa_nginx.conf (includes generated configuration files with the rest of the vhosts’ and server configuration)

11. Tomcat

Logs
/var/log/tomcat5/*
Services
Stop: /etc/init.d/tomcat5 stop
Start: /etc/init.d/tomcat5 start
Restart: /etc/init.d/tomcat5 restart
Configuration
/etc/tomcat5/server.xml

12. FTP

Logs
/usr/local/psa/var/log/xferlog
/var/log/secure
No service control (works via the Xinetd service)
Configuration
/etc/xinetd.d/ftp_psa
/etc/proftpd.conf
/etc/proftpd.include

13. Xinetd

Logs
/var/log/messages
Services
Stop: /etc/init.d/xinetd stop
Start: /etc/init.d/xinetd start
Restart: /etc/init.d/xinetd restart
Configuration
/etc/xinetd.conf
/etc/xinetd.d/* (files with “.” in the name are ignored)

14. BIND

Logs
/var/log/messages
Services
Stop: /etc/init.d/named stop
Start: /etc/init.d/named start
Restart: /etc/init.d/named restart
Configuration
/etc/named.conf
NOTE: The service is called bind9 on Debian/Ubuntu.

15. Courier-IMAP

Logs
/usr/local/psa/var/log/maillog
Services
Stop: /etc/init.d/courier-imap stop
Start: /etc/init.d/courier-imap start
Restart: /etc/init.d/courier-imap restart
Configuration
/etc/courier-imap/imapd
/etc/courier-imap/imapd-ssl
/etc/courier-imap/pop3d
/etc/courier-imap/pop3d-ssl

16. Dovecot

Logs
Logs can be found using the /usr/sbin/dovecot log find command
Services
Stop: /etc/rc.d/init.d/dovecot stop
Start: /etc/rc.d/init.d/dovecot start
Restart: /etc/rc.d/init.d/dovecot restart
Configuration
/etc/dovecot/dovecot.conf
/etc/sysconfig/dovecot
/etc/dovecot/conf.d/11-plesk-security-ssl.conf

17. Postfix

Logs
/usr/local/psa/var/log/maillog
Services
Stop: /etc/init.d/postfix stop
Start: /etc/init.d/postfix start
Restart: /etc/init.d/postfix restart
Configuration
/etc/postfix/master.cf
/etc/postfix/main.cf

18. Qmail

Logs
/usr/local/psa/var/log/maillog
Services
Stop: /etc/init.d/qmail stop
Start: /etc/init.d/qmail start
Restart: /etc/init.d/qmail restart
Configuration
Control files in /var/qmail/control/
/etc/xinetd.d/smtp_psa
/etc/xinetd.d/smtps_psa
/etc/xinetd.d/submission_psa

19. Horde

Logs
Error log: /var/log/psa-horde/psa-horde.log
No service control (works via the Apache web-server)
Configuration
/etc/psa-webmail/horde/horde.conf
/etc/psa-webmail/horde/horde/conf.php

20. Roundcube

Logs
Error log: /var/log/plesk-roundcube/errors
No service control (works via the Apache web-server)
Configuration
/etc/psa-webmail/roundcube/*

21. Mailman

Logs
/var/log/mailman/*
Services
Stop: /etc/init.d/mailman stop
Start: /etc/init.d/mailman start
Restart: /etc/init.d/mailman restart
Configuration
/etc/httpd/conf.d/mailman.conf
/usr/lib/mailman/Mailman/mm_cfg.py
/etc/mailman/sitelist.cfg

22. SpamAssassin

Logs
/usr/local/psa/var/log/maillog
Services
Stop: /etc/init.d/spamassassin stop
Start: /etc/init.d/spamassassin start
Restart: /etc/init.d/spamassassin restart
Configuration
/etc/mail/spamassassin/local.cf
/var/qmail/mailnames/<domain>/<mailbox>/.spamassassin/user_prefs

23. Plesk Firewall (IP forwarding)

Service control
Stop: /etc/init.d/psa-firewall-forward stop
Start: /etc/init.d/psa-firewall-forward start
Restart: /etc/init.d/psa-firewall-forward restart
Configuration
/usr/local/psa/var/modules/firewall/ip_forward.active
/usr/local/psa/var/modules/firewall/ip_forward.saved

24. IP Address Banning (Fail2Ban)

Service control
Stop: /etc/init.d/fail2ban stop
Start: /etc/init.d/fail2ban start
Restart: /etc/init.d/fail2ban restart
Configuration: A set of IPTables rules. By default:
iptables -N fail2ban-plesk-login
iptables -A fail2ban-plesk-login -j RETURN
iptables -A INPUT -p tcp -m multiport –dports 8880,8443 -j fail2ban-plesk-login

25. ModSecurity

Logs
/var/log/httpd/modsec_audit.log
/var/www/vhosts/domain.tld/logs/error_log
Services
Disable: /usr/local/psa/admin/bin/modsecurity_ctl -d
Enable: /usr/local/psa/admin/bin/modsecurity_ctl -e

Problem : 

website not loading – error is “website is not redirecting properly”

Log:
Check the log file using comand “cat /usr/local/apache/logs/error_log | grep domain.com”

[Fri May 13 14:38:47 2016] [error] [client 122.166.23.31] ModSecurity: Access denied with redirection to http://domain.com/ using status 302 (phase 2). Pattern match “(?i:(?:[\\”‘`]\\\\s*?\\\\*.+(?:x?or|div|like|between|and|id)\\\\W*?[\\”‘`]\\\\d)|(?:\\\\^[\\”‘`])|(?:^[\\\\w\\\\s\\”‘`-]+(?<=and\\\\s)(?<=or|xor|div|like|between|and\\\\s)(?<=xor\\\\s)(?<=nand\\\\s)(?<=not\\\\s)(?<=\\\\|\\\\|)(?<=\\\\&\\\\&)\\\\w+\\\\()|(?:[\\”‘`][\\\\s\\\\d]*?[^\\\\w\\\\s]+\\\\W*?\\\\d\\ …” at REQUEST_COOKIES:ci_session. [file “/usr/local/apache/conf/modsec_vendor_configs/OWASP/rules/REQUEST-42-APPLICATION-ATTACK-SQLI.conf”] [line “116”] [id “981243”] [rev “2”] [msg “Detects classic SQL injection probings 2/2”] [data “Matched Data: \\x22122.16 found within REQUEST_COOKIES:ci_session: a:4:{s:10:\\x22session_id\\x22;s:32:\\x22a47de87a3c7f57ec1f9dbb82b4845267\\x22;s:10:\\x22ip_address\\x22;s:13:\\x22122.166.23.31\\x22;s:10:\\x22user_agent\\x22;s:76:\\x22Mozilla/5.0 (X11; Ubuntu; Linux x86_64; rv:43.0) Gecko/20100101 Firefox/43.0\\x22;s:13:\\x22last_activity\\x22;i:1463128700;}c9407b7ac67fc7b1072a1face286f1b8”] [severity “CRITICAL”] [ver “OWASP_CRS/3.0.0”] [ma [hostname “india-travel.biz”] [uri “/”] [unique_id “VzWZn0BPX1MAAEYn43EAAAAW”]

Fix:

Disable mod_security in WHM >> Home » Plugins » ConfigServer ModSecurity Control

select the domain > modify domain whitelist > off

Now the site will load. But we are unable to access the pages.

Then disable the rule in /usr/local/apache/conf/modsec_vendor_configs/OWASP/rules/REQUEST-42-APPLICATION-ATTACK-SQLI.conf – line 116

Then enable modsecurity >>>> select the domain > modify domain whitelist > on (for that particular domain)

It will automatically restart apache. Now the site and  pages will load fine.